
How To Pick A Lock With A Paperclip. You will need a tension wrench and an appropriately sized paperclip.
The paperclip should be smaller than the keyhole and at most two times larger. Turn your tension wrench so that it leaves enough space inside the keyhole for your paper clip.
Press gently into this gap with the rounded side of the paperclip. When in place, jiggle it back and forth repeatedly until you feel several pins move from their original locations thereby unseating them from their counterparts on the opposite side. Once done, push till your door will open.
How To Pick A Lock With A Paperclip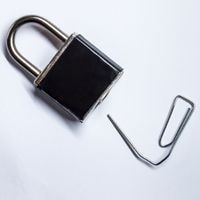
Picking a lock with paper clips can be accomplished in pretty much the same way as picking one with a traditional tension wrench and rake. One just needs to turn two paperclips into those two very separate tools, and then pick the lock with them as you would normally do.
In this article, we discuss how to pick a lock with a paperclip.
Build A Tension Wrench
Take one of the paper clips that you have and straighten out the first two bends completely. You should now have an L-shaped piece with an extra loop as a handle.
It’s important at this stage to use your pliers to keep the final product as straight as possible since you will be needing it to sit flush with the bottom of the lock.
If you don’t have pliers, you can use your fingers without worrying about damaging the paperclip due to its malleable nature.
Create A Rake
The first step to making the key is to straighten out a second paperclip. You will then use your pliers and bend them at a 90-degree angle to create the very first ridge in the rake.
Then you’ll need to continue bending the clip until you have three bends next to each other which creates a ‘zig-zag’ pattern with which we can make a key.
Apply The Tension Wrench
The tension wrench should be placed at the bottom of the keyhole. Apply slight pressure with your tension wrench in the direction to open the lock.
If you don’t know which direction to turn, try turning clockwise, then counter-clockwise. There will be less resistance when you are moving in the correct direction compared to when you are moving in the opposite direction.
If you can’t feel the difference, take a guess and switch if it isn’t working! Keep applying pressure on your tension wrench throughout the lock picking process to ensure that you are successfully picking it.
Put The Rake In
By pushing all of the pins at once, this rake allows the tension wrench to turn the lock just enough when each pin interacts with its corresponding notch.
Make sure that the rake is inserted all the way in, so it is pushed against the back of the lock. The rake should rest on top of the tension wrench.
Scrub Your Rake
Move the rake up and down until you feel the tension wrench turning. When this happens, hold the driver pin on the plug while the key pin falls down.
Essentially, what key normally would do. You want to do a smooth motion with your hand when manipulating these pins so it will speed things up.
Don’t be slow with this process and try not to yank or jam paperclips into them either. A bit of trial and error will be needed here, specifically if it is your first time changing locks.
Apply Tension And Scrub
Apply light but even pressure to the tension wrench. Move the rake along the pins – if you apply the rake in and out, the pins will not align correctly.
You will feel a slight reduction in resistance as each pin is picked. In some locks, clicking sounds or changes in resistance may be felt additionally.
Repeat this step as necessary until all of the pins are aligned. Apply slightly more pressure at this point as more of them may become set without additional effort on your part.
Torque To Open
Once all the pins are aligned, you will find that with the correct torque on the tension wrench, the lock will unlock. Once you’ve gained entry or opened the padlock, remove the paper clips.
Related Guides